Friday, December 9, 2011

What to wear to your HOLIDAY party!!

Since this is the time of year, I will repost again from 2009. I hope this helps with your holiday dressings!!!
With all the Holiday invites that will be filling your mailbox in the next few weeks, I am going to de-code the dress code for you! When you are at a loss of what to wear, let this be your guide!!!
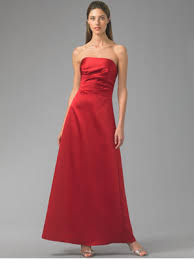
BLACK TIE

This means women should wear a LONG dress in a suitable evening fabric- such as silk, velvet, satin, organza, lace, or chiffon. For men a tuxedo is required.


CREATIVE BLACK TIE

This is your excuse for a bit of excess with your usual Black Tie outfit. The invitaiton should help you with the theme for which your host is decorating. Add some sparkles or a fur. If you are still unsure, call your host, they should be more than happy to help you!
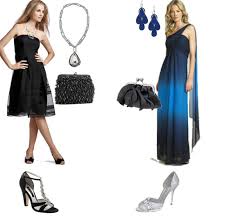


BLACK TIE OPTIONAL

You will find both men and women in full Black Tie attire. You will also find women in fabulous evening suits and short cocktail dresses. These dresses should still be luxurious fabrics. Men should wear a dark suit if not sporting a tuxedo.
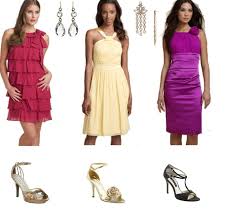


FORMAL

This option is a favorite because it gives you an excuse to wear something AMAZING!! Wrap yourself in a fur, pull out the sequins, beaded, metallic or paillette covered dress! Slip on a pair of heels with patterned tights or hose.(This is a great option for those cold evenings) This is your chance to live your own "Red Carpet" moment! Men can dress up their black tuxedo by wearing a white tie or smart vest.


INFORMAL

For the most part, this means pants with a nice sweater or a blouse for women. Men can wear pants witha sweter or button down shirt. Ties are NOT required for an informal event. The later the event starts, the dressier you should be.
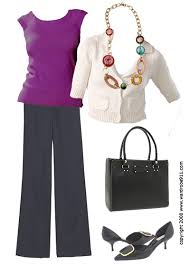


Cocktail

Attire for a cocktail party is probally the easiest. You will probally recieve the most invites for cocktail parties during the holiday season. Some women will bring a change of shoes or jewlery to make their work outfit more festive. You can also wear a dressy camiosle under an unbuttoned jacket for a quick change. A short dress is preferred over long. Men can wear their work clothes(provided they wear a suit and tie to work).
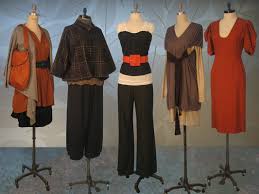
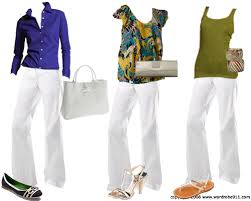


DRESSY CASUAL

Essentially, this means to get "gussied up"!! Wear something beautiful and comfortable but still in a luxurious fabric. From something fun to bold, or just a great pattern will work. These events are usually held at someone's home, so feel free to wear those amazing heels that made for show and no on the go!! Dressy casual for men means either nice jeans with a sweater or a button up shirt with a blazer.
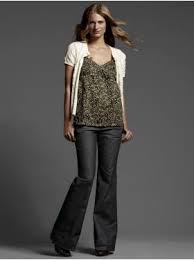


CASUAL

When you attend a casual event, remember that does not mean sloppy! NO holes in your jeans (no matter how trendy)!! A dark wash jean with a clean silhouette looks great on most women. This look can also be dressed up with an off the shoulder top, bling jewlery or a shawl. Men can wear jeans with a plain(no art work) tee-shirt with a blazer or a button down with the sleeves rolled up.


While attending a ballet or holiday concert, you should give your performers your best. The actors and dancers have practiced for months to entertain you, the least you could do is leave your jeans at home! You can't go wrong with Dressy Casual or Cocktail attire.

My last tip is to map out your clothing choices! Think through your outfits and what guests will attend which parties. It would be a crime to be seen wearing the same outfit more than once! AND you don't want to be looking at the season's photos and realize you wore the same thing to each event! Ladies can recyle dresses and men can wear the same suit, but be sure to change the accessories (jewlery, furs, shawls, ties, or vests) for maximum impact!
Enjoy your parties!!!!!

Tuesday, November 8, 2011

Jewelry Organizer

Does anyone else have the same problem as me?? I discovered I have way too much costume jewelry!!! I never wear most of it because I can't see it when it is jumbled up in my jewelry box. I came up with an idea to display it forcing me to wear all the pieces. **NOTE** My good jewelry still hangs in my felt lined jewelry box for safe storage.


Supplies:
Cheap frames
Black spray paint
Cork board
Fabric of choice
Hot Glue Gun and sticks
T-pins


1) I bought cheap frames from Big Lots. I didn't care what color they were, I just bought them for their shapes. 1 was pink, 1 was blue, a couple of gold ones and black too.

2) I broke out all the glass. (do this over the trashcan to avoid a big mess) Make sure to keep the metal clips in place, you will need them later.

3) Spray paint all the frames black, or what ever color is your choice. Let dry.

4) I went to Jo Ann's and bought cork board on a roll. I had a coupon for BOGO, so I purchased 2 rolls. Also purchased the T-pins at the same time.

5) As the paint was drying, I covered the cardboard backing from the pictures with cork. Just cut to size and glue into place.
***TIP*** For the frames that would hold my heavier necklaces, I doubled the cork for more stability.

6) Cover the cork with fabric of your choice. I had leopard on hand, so no expense there, BONUS!! I covered only the front and wrapped the edges by an inch then hot glued the edges down to the cardboard on the back. I ONLY glued down the edges on the front at each corner. I didn't want glue to show through the fabric or get in the way of my pins.

7) Re-insert the fabric covered cork and press the metal clips back into place.

8) I arranged the layout on the floor and then hung into place in my closet. I added a sconce above to finish it off.

9) I then hung my jewelry on T-pins (in the upholstery section at craft stores)

10) VIOLA!!! Homemade jewelry holders!!!

Upclose view


T-pins used for holders


See the missing necklace? Now I know where to hang it when I'm done wearing it!


I chose long frames for bracelets and short necklaces.(hung sideways) Then another one hung the proper way for my longer necklaces.


This whole project took me less than 2 hours start to finish, and less than $30 in supplies. Send me a pic of yours, I'd love to see the finished products. :)

Until the next project!
XOXO

How to make a stroller into a pirate ship costume


I had this brilliant idea that I was going to make Carson's first Halloween costume. I contemplated over many costumes and nothing seemed to fit his personality...believe me a 6 month old  has a personality!! My dad aka JIM PA is always tells Carson pirate stories and is getting him geared up for his 1st trip to Mexico this month. So I thought what a better idea than to make him a pirate with his own personal ship!

The costume was super easy, black pants, a white shirt and a red do-rag. Throw in a foam sword and he was ready to sail the seven seas. Now the harder part comes, how do I turn his stroller into a pirate ship??

First I saved a box from his new walker. I thought it would be big enough, but I had to piece together more cardboard for the front end. I drew out the design on paper and started building!


I cut out the side, even with his stroller so he could see out!


Taped the front end to the sides


The flaps will rest on the tray for stability


The top of the front of the ship, also rests on the tray (see notes later about velcroing these)


see how the 3 wheeled stroller fits right in?? Perfectly!


All finished with the building part. Now to cover the entire thing with brown duct tape to look like wood planks. **NOTE** I wanted the inside of the ship to be "clean" of writing, that is why I did it this way!


I made the cannons out of paper towel rolls. I cut the ends into 4's and then slipped the edges under the tape.


I covered the cannons is a lighter duct tape and then slipped the cut edges under the "planks"


This actually held really well, just place the duct tape around the cannon


3 rolls of dark brown duct tape later, I had the ship finished!! Now just onto the finishing touches!!

I hot glued batting into the cannons for the smoke


See the treasure chest on top?? This was the most time consuming, but I was being meticulous


I bought a paper treasure chest from the party store


I glued yellow felt to the inside as a filler, so I wouldn't have to use as many beads or plastic coins.


Finished treasure chest!!


Side views


I cut out a scull from a pirate costume and glued it to the ship. I wanted the treasure chest to be removable for easy transport, so I velcroed it to the ship.


Just when I thought I was finished, I had another idea. The coins need to be spilling out! I hot glued coins to the ship and then set the chest between them. Remember the chest is velcroed for easy removal, so this was a perfect guide as the wear to attach it.


How did I forget the mast??? I rolled 2 wrapping paper rolls in the matching duct tape, and tied them together with some twine. It looked like a cross at Easter draped in material instead of a mast, so I added the guide wires and a parrot.


To attach the ship to the stroller: Remember the flaps from the earlier pics? I attached those flaps to the top of the ship with Velcro and let it sit on the tray. Then in the back, I punched a hole in each side and tied it together with the same twine as the mast.

Finished product:


My happy lil' pirate!!
(see the holes and twine to hold it together??)


Complete with a foam sword!
(I also added another scull to the sail)


3 wheeled stroller turned Pirate ship!!


Carson made a big impression all over town, everywhere he went to trick or treat. Haunt the Zoo, he had hundreds of oohhers and awwers. Celebration Station, he had his picture taken a dozen times. The neighborhoods even loved him. He even made the news!! He was on Channel 4 three different times! And YES, I had them send me a video of it! ;)

I'm not sure if I can outdo myself for his future Halloweens, but he was the best dressed pirate this year.

PS- This folds up flat and is currently in his closet. I'm not willing to sell it (I've been asked), I'm saving it for him to enjoy when he is older!

ARRRGGGG!
XOXO